I want each post to have a snapshot of the blog's code at the time it was created. What I was doing so far was updating a field in the database with the post creation's hash. But that has a problem: I only have that hash after creating the commit, so I needed another commit to update the database with the hash of the commit. The history was turning into something like this:
            ...
            5997d1a Post commit number
            8406233 New post
            a7b89b6 Post commit number
            d7cb3c3 New post
            f37c21f Post commit number
            a3d8950 New post
            ...
It would be better to create a single commit that included the commit number in the database. For doing that, I would need to compute the hash before committing the changes. But that's almost impossible: git uses a hash function to compute it. I've seen this formula here, but I don't know very much about git internals and maybe it's wrong:
And they have another important property: it's almost impossible to find two different inputs that have the same output. If there is a way to do it in a better way than trying randomly, the hash algorithm is considered "broken" and must be replaced.
git uses SHA-1 for hashing. It has not been considered secure since 2005 and was deprecated in 2011. That means that, in theory, I should be able to "break" the algorithm and generate content with the same hash. Anyway, I've read that git is introducing SAH-256 so that solution would help me only for some time.
Also, what I really want is to generate a commit number that, once stored in the database, generates a hash equal to the same number stored. I don't even know if it's more simple or more difficult, but it won't be easy anyway.
The solution is to use another tool for "marking" the post, and I think that the right approach is to use tags.
I haven't used them very much while working with git. I think the only time I've used them was when I released some version of Ruby's Amplitude gem and, if you see the history, there is a "list" tag there that doesn't seem to fit.
Anyway, there are two tag types in git, lightweight and annotated. Usually, it's better to use annotated tags because they provide much more information than lightweight ones. I didn't know why they were better, but I've found this post on StackOverflow explaining it: with annotated tags you know who and when it was created. In this case, maybe I could use lightweight tags because I'm the only user of this repository and you have the post's date on the DB, but I think using annotated ones won't hurt so I will use them.
So, from now on, snapshots on the blog will be tagged with the post's slug, and git history will be clearer. If I want to see where the posts are, I can just use this command: git log --tags --simplify-by-decoration --pretty="format:%ci %d":
I was about to write a post about adding pagination to the blog. I already started that some time ago, trying to use mamba for tests. But I think that the world doesn't need another post about how to add pagination to a very simple Flask app, so I will skip it.
We are still on time to talk about the new year's resolutions, so I think I'll do that. Yes, the world doesn't need another post about the new year's resolutions either; but I only have one, and I want to share it with whoever is reading this post: this year, I won't play video games. None of them. Not a minute. In any platform.
I've realized that I spend a lot of time playing video games. I could try to reduce the time spent with them, but they are designed to catch attention and induce users to play. It will be a fight between my willpower and their psychological tricks, and I'd probably lose. The only winning move is not to play.
Breaking a habit is hard, and I'm sure sometimes I'll be really bored or with a need for disconnection and with nothing to do. That will be good because those moments will allow me to find new interesting things to do. In my dreams, I'd have a lot of free time to do interesting things. In practice, it has allowed me to read a lot. But I'm just starting, and I think reading is more useful than trying to beat level 12 on Rygar without losing a life.
There is only one exception to the rule: when playing a videogame is something social, I could do it. I don't mean playing on the Internet with strangers. That exception is for being able to share time playing video games with my daughter, or maybe with friends someday. But the social part of the event should be relevant: playing a multiplayer game is not enough for that rule to apply.
At the moment I've accomplished 18 days and counting. I think this is the worst part because I'm still breaking the habit. I think I'll be able to do it; it is, after all, a single resolution.
It's been a while since I last wrote a post for the blog. My goal was to write a weekly post, and I was
accomplishing that, more or less. But a pandemic came, and my life (and the life of many others) changed a lot.
Since then, I've been working as a contractor for a foreign company (one of my goals), I've won a tenure (another
one), and my research efforts had been centred on the ones required by my positions; basically, Rails and React
developing skills.
But a new year has come and, with that, a new opportunity to retake this blog. My goal will be to write a weekly
post. I think I'll mix technical posts and more personal ones, but time will tell. I hope I can keep up the pace
this time: one of my new year's purposes is not to play video games anymore; that should give me a lot of extra
time for different projects.
So time to deploy this blog again. How was it done? I think I have a README somewhere...
First thing I found out was that HTTPS is not using SSL anymore: it was substituted by TLS and deprecated in
2015. But both are public-key encryption protocols and use the same type of certificates. I'm not going to do
any research on how the protocols work right now, so in principle, this is not relevant.
The objective is to include my root certificate in the Android System and generate certificates for development
signed with it. I could use a ‘localhost’ certificate this way, impossible to obtain in another way.
I didn’t know how certificates work. What I found out is that certificates used for TLS are in a standard format
called X.509. They can be stored in a file using different formats, usually identified by file extension: .pem,
.crt, .cer, .p12… but they contain the same information.
The steps to generate a valid X.509 certificate are these:
First, you must generate a public-private key pair.
Then, you generate an intermediate certificate which contains your data, including the domain or domains
which can be used with it. This certificate is still not valid.
The intermediate certificate must be signed with your private key. With that, you create a Certificate
Signing Request (csr)
You send the csr to a certification authority with your public key so it can decrypt it and obtain the csr
The certification authority will verify your identity, and then it will sign the csr with its private key,
generating a valid certificate.
So let’s see how can we do it for a development environment.
Step 1
The first step is to generate a key pair. This is done with:
This will generate ‘development.server.private.key’ file with a key length of 2048 bits. That’s the key we will
use to sign the csr, and we shouldn’t send it to anyone. But it is for a development server, so you don’t need
to worry very much about it.
This command will ask you some information to generate the request, but you can automate it using a
configuration file which contains all the certificate’s data. X.509 is a very complex format and you can fill a
lot of fields, but a basic configuration for development could be this one. I’ve named the file
‘development.server.cnf’:
We can examine the contents of the csr with `openssl req -in development.server.csr -text -noout` or using an
online tool like this.
Steps 4 and 5
Step 4 is to send the certificate to the Certification Authority. You will be the certification authority; to
become one, the first thing to do is to generate a key pair with the same command we used in step one:
openssl genrsa -out rootCA.key 2048
We will use a command similar to the one used for steps 2 and 3, but this time we use the -x509 option. This
will generate a self-signed certificate: a certificate which nobody has trusted:
‘-nodes’ option is for generating it unencrypted (no-DES). ‘-days’ is the duration of the certificate. The .cnf
file used for the certification authority is:
Then you must install the root certificate in your browser. In Firefox, for example, you have it in
about:preferences#privacy. There is a tab for root certificates with an import button. It will appear at the top
of the list thanks to “AAA FAKE CERTIFICATION AUTHORITY” in O field.
Now you are the certification authority. The last step is to sign the development server csr.
With that, you have ‘development.server.crt’, which is the file to use in the server along with the private key.
The certificate must contain a unique serial number assigned by the Certification Authority. This number will be
stored in ‘rootCA.srl’ file. It’s generated randomly and you can ignore it if you don’t plan to generate a lot
of certificates with that authority.
Then you will need to configure the certification along with the server key to serve https pages.
All this process is too complex to remember every time you need an https environment, so I will encapsulate it
in a Docker container.
I need to get https working on my development environment to test PWAs. But, how does https work? The main concepts here are key pairs, signing request and certificates. I had some trouble at first with these, so let’s start with an example.
Imagine that the Internet didn’t exist and you wanted to sell expensive tickets for an event. There are multiple vendors, and on other times it's been found that people are selling fake tickets. What could you do? A possible way to do it would be this: first, you would need a previous process to prove that you can sell the tickets:
You fill out a form with the event’s data and put your signature on it.
You send that form to a notary public.
The notary public checks that you can sell tickets.
The notary fills out a new form with the data you send to it, maybe modifying some fields, and signs it. That new form contains a copy of your signature.
The notary sends that form to you.
Now you can sell tickets this way:
A client wants to buy a ticket, and ask you for identification.
You send a copy of the form that the notary sent to you.
The client checks the notary signature, to see if it’s authentic.
The client then sends you the money.
You send back the ticket signed by you. The client is sure that is an authentic ticket because she trusts the notary.
(Note that we are not addressing the payment issues here: you could get the client’s money and never send her the ticket)
The key point here is that the client must trust the notary signature, or you could fake it. The client doesn’t trust you, only trust the notary. But the notary told her that you can be trusted on this, so the client trust you.
There is a problem: the client can’t trust every notary in the country. But maybe it trusts the Mayor of his village. So the notary would need a paper signed by the mayor trusting that notary (I think that’s called an “apostille”) using the same system as you did with the notary.
Given this system, what would be the equivalent concepts in SSL?:
Your signature (and notary’s signature) would be a public-private RSA key.
The form you send to the notary would be a Certificate Signing Request
The notary is a Certification Authority
The form the notary sent back to you, signed by her, would be the Domain’s Certificate
The notary has a certificate too, but nobody has trusted it. It’s a self-signed certificate. It’s only valid if you already trust the notary.
So, to test https in development, we should:
Generate a self-signed certificate for a Certification Authority and configure the browser to trust it.
Generate your signature (a RSA key pair)
Generate a certificate signing request for your development’s domain.
Create a certificate from that request, signed by the certification authority.
Use that certificate in your development’s browser.
I hope that the concept is clearer now. Time to get back to code.
I’ve almost finished an specialization about reinforcement learning, so it’s time to test the skills I’ve gained.
It’s only an introductory course and we have only scratched the surface of RL, but I think
I can code a simple agent to play a children’s game: Deserto.
I’ll write about RL and implementing agents later, but it’s not as easy as just implementing it: there is a lot of additional work to be done. I’ll need a way to test my agent with human players, and a mobile app will be the best option for that: you could enter the moves of the other players on the phone and see the agent’s move on it. Maybe that’s putting the cart before the house, but I’m still doing the last course of the specialization and I want to implement my agent after finishing it, so implementing the agent’s interface is a way to advance some work on it.
I could implement an Android app or a React Native one (I’ve done this before). But, why should I? A simple web interface would suffice for what I want: it will contain only some graphic elements and a engine to run a pre-trained agent. So I could create a Progressive Web Application (PWA) and get the best of each world: a Web app and an installable mobile app.
That’s something I haven’t done before, so it’s time to learn. I will first implement a dummy “Hello World” PWA. The minimum characteristics of PWAs are, as stated in Wikipedia:
Originate from a secure origin. Served over TLS and green padlock displays (no active mixed content).
Load while offline (even if only a custom offline page). By implication, this means that progressive web apps require service workers.
Reference a web app manifest with at least the four key properties: name, short_name, start_url, and display (with a value of standalone or fullscreen)
An icon at least 144×144 large in PNG format.
I will test in on an emulated Android terminal. First thing to do is to serve the app over TSL. I haven’t used SSL for development and I only have a superficial knowledge about how certificates work, so the first step will be to research it.
I am currently working as a teacher for Generalitat Valenciana. It's always been said that teachers have a lot of paperwork. It is not my case, but it could be because I work in vocational training: we fill a curriculum design at the start of the school year (which nobody reads) and not much else.
However, there are two things I must do every day. The first is the roll call: I must register in a Generalitat’s application who has attend the class and who hasn't. The second is to put on record that I’ve been there teaching the class. It might sound weird, but the reason is the school receives money from CE development initiatives for each day I attend . My school knows which days I’ve been there , but I'm the one who must leave a written record ; I think it’s a fraud prevention measure.
Each day that I do something that has no clear value, my little DevOps’ heart is torn apart and I that makes me think how to automate that process. I see the value of calling the roll, but not the value of marking my assistance. I've been thinking about automating it for years, but the check to mark my assistance is on the same web page as the roll call and it is easy to mark it; it seemed to me that automating it will give me more work than I would save, but the school has implemented a new system to revise the missing checks which are giving me additional work, so I think it is time to do it.
To automate it I’ve chosen Cypress. It’s a testing tool, not an automation one. In its documentation, they warn about using Cypress for testing pages we don’t own, but it’s a tool I’m interested in learning so I’ll give it a try.
Installing Cypress is simple, we only need to `npm install cypress` and then we can run it with `npx cypress open`. It comes with a couple of examples of test that you can run against a Cypress.io web page.
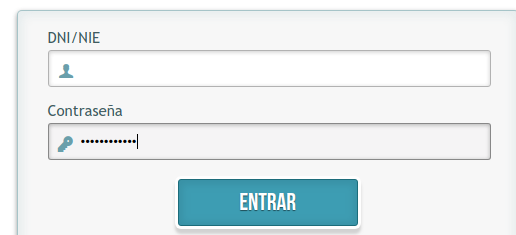
I thought it would be simple to automate login. The login screen is like this:
Opening the page was simple:
it('Opens the login page', function() {
        cy.visit('https://docent.edu.gva.es')
        cy.contains('DNI/NIE')
        cy.contains('Contraseña')
    })
The first problem I encountered was with field selection. The user and name fields have weird names (`form1:j_username` and `form1:j_password`) You can select them with `document.getElementById(‘form1:j_username’)`. The equivalent instruction in Cypress is `cy.get`, but when you try to do the same you get an error:
I couldn’t find a way to “escape” the colon, and I needed to use a workaround: cy.get(‘[id$="j_username"]’).
The second problem was typing. I stored the fields in variables and then tried to type into the field (to my surprise, you have to declare the variables):
const USERNAME_SEL = '[id$="j_username"]'
const PASSWORD_SEL = '[id$="j_password"]'

let username = cy.get(USERNAME_SEL)
let password = cy.get(PASSWORD_SEL)

username.type('banana')
username.type('potato')
Cypress only typed in the second field:
I think there is a reason for that, but it was simpler to chain selection and typing and avoid the variables:
I stored username and password in cypress.env.json file, placed at the application’s root directory. That file should not be checked into git, because it has sensitive information.
The last problem I found was the login action. I thought it would be as simple as clicking the button:
But Cypress wasn’t able to load the page. There is some kind of SSO system: when you log in with the POST request, you get a 302 redirection response and Cypress is not able to manage it.
I tried to solve it in a couple of ways, but after a bit of searching was unable to do so. At this point I stopped: my idea was to learn a little bit of Cypress trying to automate a process, but it's clearly not the right tool for the job (as it’s said in the documentation!)
I thought Cypress would perform simple web browser automation, but it seems it does much more than just send keystrokes and interact with page elements. It is not a “transparent” tool, so you don’t have the same behaviour as you would have with a real web page. Maybe it causes weird errors testing web pages, or maybe it doesn’t catch errors which would occur in production, but it’s a widely used tool so, if it happens, it would be in rare occasions.
To continue with the task I should use another tool like Selenium Python Web driver: it seems that it is a simple automation tool which can be integrated with a test framework. But I think learning that won’t be very helpful to me, so I’ll spend my time with a technology I will need earlier: Progressive Web Applications.
I’ve been writing posts weekly but I haven’t published them yet. That’s because publishing a post here is not straightforward: I write it on Google Docs,
then I pass it to my wife for corrections (she is more fluent in English than me) and then it must be reformatted to HTML. After that, I should regenerate the blog and upload it to the host using ssh.
The idea is to make this process more efficient. First thing I was tackling was HTML formatting. The posts don’t have a complex HTML structure: they are
paragraphs, inline code, blocks of code and some figures and tables when needed.
When I paste them into Visual Studio Code for editing, I end with one long line for each paragraph where I must add the start and end tag manually. Them, I must break the lines in 80 columns, more or less. After that, I add the code’s tags and additional HTML when needed. It’s not very much work but it’s boring. And if I modify the contents after formatting, the lines aren’t 80 cols width anymore and I must readjust them.
To solve that I thought of writing the posts using Markdown. I could use it directly in Google Docs (it’s quite human-readable) and then I could paste it directly on the VS Code’s editor. I think it should exist an extension to reformat it to 80 cols, so I shouldn’t do anything more. After that I would convert Markdown to HTML before rendering the post, keeping the original markdown version in the database.
The idea with this blog is to learn, so: why not implement my own markdown to HTML converter? I know there are converters available, but I’d learn much more if I built one myself. It’s been years since I implemented my last compiler (in Visual Basic 6!) and I could refresh my knowledge.
The first thing I did was searching for Markdown’s specification. For my surprise, that specification doesn’t exist.
There are lots of different flavours and an attempt to
unify the versions with something called Commonmark.
I was expecting to find the syntax rules, something like this:
expression = atom   | list
atom       = number | symbol
number     = [+-]?['0'-'9']+
symbol     = ['A'-'Z']['A'-'Z''0'-'9'].*
list       = '(', expression*, ')'
But I only found something similar in one of the Markdown’s implementations.
After that, I downloaded a pair of compiler design books: the classic “Compiler: principles, techniques and tools”
and “Modern compiler design”, from Dick Grune et al. I went through the books a little bit and refreshed my knowledge, revising what are the steps to analyze a language and generating something from it.
The last step was to abandon the project.
I didn’t remember that building a compiler was so much work, and I didn’t know Markdown was so complex. Although I’d need to implement only a subset of the language, given the time I have to code, programming a simple compiler would take me at least a month. Moreover, it wouldn’t have any practical utility beyond practising some Python. So, after weighing the pros and cons I think my time will be best spent doing other things.
That’s one of the things I’m learning as I age: my time is limited and, if I do something, there is another thing I won’t be able to do. I prefer to spend more time learning Artificial Intelligence: in the time I would spend programming a compiler maybe I can do one of deeplearning.ai courses.
But formatting paragraphs still bother me, so I’ll try something more simple: writing some code to reformat
tags and paragraphs. Perhaps I’ll take a look to VS Code extensions to implement my own beautifier, I think it will be quick to implement one to do that simple formatting on HTML documents.
Last week I’ve been implementing blog’s database. I will be using a sqlite3 database, but the idea is to decouple the repository from the database so, if I change it later to another database system, only the repositories classes need to be modified.
I don’t want to use Alchemy for the blog. An ORM is a complex layer of software that you must know well if you plan to use it for something more than CRUD operations, or it will launch very inefficient queries to your database. ORMs have another drawback: they are tools for mapping objects to relational databases. What if I want to use another kind of storage, like a no-SQL database? I think it will be more difficult to change the persistence layer if it’s coupled to an ORM.
For this project, I would like to practice some Domain Driven Design techniques. Not the ubiquitous language (I won’t be sharing this with other people) but I’ll use things like Value Objects, Entities or Repositories.
So let’s start.
The first thing to do is to open the database. Whose responsibility should that be? The path of the database will be configured somewhere, and I think that Repository classes shouldn’t be aware of that configuration. So I created a module `db.py` with a utility to open the database and store it on Flask’s ‘g’ object: that is a kind of global variable available during the request. Flask’s documentation talks about “contexts”, but I didn't find it necessary and will investigate it later. The database is opened only when needed. See that I’m using a Repository here, more about it later:
The only database-specific functions we have here are `get_db()` and `close_db()`. They are in a separate file (`db.py`) so I think it’s pretty isolated from the rest of the code. If I wanted to use mysql, a connection pool, etc. I would only need to change that file.
For example, this is what I have in get_db() function:
def get_db():
    if 'db' not in g:
        g.db = SQLite3DB(current_app.config['DATABASE'])
    return g.db
Here I’m instantiating a `SQLite3DB` object, which provides an abstraction layer to access the database. It has two methods: `query()` to launch a query to the database, and `close()` to close the connection. It opens automatically the database when needed. If I wanted to change the database to MySQL, for example, I should change only that method to instantiate the appropriate object.
I could have used a Python’s Abstract Base Class to define an interface for database access, but that would had assumed that different persistence systems would have similar methods, like query. The database object is only coupled to the repositories, and in a different persistence system maybe something like a query perhaps doesn’t make sense.
The next problem I found was how to create a Post from a SQL row. Who should do it? Post? Repository? I think none of these should know how to build a Post, so I created a PostFactory class. That class has only one class method: `from_sqlite3_row` who takes the cursor and the row and generates the post. Maybe I should have created a specific factory for SQLite, for example, a PostSQLiteFactory class, so I can have for example a PostFirebaseFactory class later if needed.
This is the code for PostFactory:
class PostFactory():
    @staticmethod
    def from_sqlite3_row(cursor, row):
            field = lambda x: value_of(field_names, row, x)
            field_names = list(map(lambda x:x[0], cursor.description))
            return Post(
                title = field('title'),
                date = field('creation_datetime'),
                content = field('content'),
                commit = field('commit'),
            )
There are things that seems to creake when I use Python, like the use of decorators for things like accessors and static methods, maybe it’s a lack of habits.
In this function, I’ve used some techniques of functional programming that I learnt with Javascript: maps, for obtaining a list which contains only the cursor’s field names, and partial application. I have a function called `value_of` which takes a list of field names, an array of data, and the field I want to get. I created the `field` lambda which always applies the cursor’s field names and row data to `value_of`, so I only need to call it with the field name. I think is more readable than having to repeat the same parameters for each call.
Maybe I could have converted the whole row to a dictionary, but in the end, I did it like above.
When is that function called? In SQLite3DB query function I have this:
Before executing the cursor, I set the row_factory property of sqlite3 db to the previous defined function. It will be the database’s library who call the Post factory function every time I need to access a post. In PostRepository I have a single function at the moment to obtain the posts of home page:
def home_posts(self):
    cursor = self.db.query(
        '''
        SELECT * FROM Posts
        ORDER BY date(Posts.creation_datetime) desc
        '''
        ,factory = PostFactory.from_sqlite3_row)

    return cursor
When the program accesses each element of the cursor, the `row_factory` function will be called automatically. I’ve found this a very interesting feature of sqlite3 library, maybe another db libraries have something similar but I haven’t checked.
Well, enough database for now. There is something interesting that Alchemy provides and I don’t have at the moment: database migrations. I’m performing database creation and modifications by hand, but I would like to automate that in the future.
I’m creating the blog's code structure. First I’ve created a class and a repository for posts. They are in a
subdirectory. I don’t know if this is the correct structure for a project, but I’ll start this way and refactor
later if needed. The current structure is like this:
'fr.sh' is the script I use to call Flask. `build.py` is the script to call Flask Frozen and build the site.
'instance' directory is created automatically (I don’t know its use yet) and 'simplertimes' is where the app is
located.
The app bootstrap occurs in '/simplertimes/__init__.py'. For now, that’s the only file that contains code. From
now on I have the functions to manage the routes and render templates:
‘simplertimes’ directory is a python package. So, in fr.sh, I have this code:
        export FLASK_APP=simplertimes
        export FLASK_ENV=development
        flask run
It seems that flask imports the package. When you import a package the code on __init__.py is executed, so flask
can get the app object and start serving it. The name of create_app function is a Flask’s convention. For
example, if I rename it ‘banana’ nothing works.
Now, I want to use Post and PostRepository in create_app function. I’ve used one file for each class and placed
them inside ‘posts’ directory. Doing that I have the following structure:
A module called 'post', implemented in 'posts/post.py' file
A module called 'posts_repository', implemented in 'posts/posts_repository.py' file
A package called posts, which includes both modules
In Ruby I would have done something similar, creating post.rb and post_repository.rb in `posts` directory and
then,
in main code:
This would have led me to With that I could use both classes directly:
            p = Post.new()
            r = PostsRepository.new()
However, Python works differently. Instead of executing code and importing everything defined there into the
main
namespace, it creates a namespace for every module imported. So if I do:
            import posts.post
            import posts.posts_repository
I won't be able to use the classes this way:
            p = posts.post.Post()
            r = PostsRepository()
            NameError: name 'Post' is not defined
That is because each class is defined in its own namespace. When I import a module, I import the module
namespace
into this namespace: instead of having Post defined we have posts.post namespace defined and, inside it, the
Post
class. So I must refer to the namespace when I use the class:
p = posts.post.Post()
That is very verbose; and, if we change the code’s structure, we should change all occurrences in our code.
There is another way of importing the classes: instead of importing the module’s namespace, we can import
something
defined into that namespace directly into the current namespace:
            from posts.post import Post
            p = Post()
This is more similar to the Ruby’s version, but in this case, we are only importing one of the definitions of
the
module. If we want it to work like in Ruby we can import everything this way:
from posts.post import *
At first, I was frustrated with Python’s way, but now I realize it is more flexible than Ruby’s. There is
another
thing we can do to improve the import of the posts classes to import all at once with a single command:
            from posts import *
            p = Post()
            r = PostsRepository()
The trick is using '__init__.py' file of posts directory. Remember, 'posts' is a package and, when it is
imported,
__init__ is executed. If we import all submodules’ definitions in that file, then those definitions will be
imported
when we import the module. The contents of 'posts/__init__.py' will be:
            from .post import *
            from .posts_repository import *
And then I can use both classes as mentioned above. You can download examples of the above code in this zip.
Of course, we could do the same in Ruby creating an intermediate ‘init’ file in posts directory, but Python’s
way
may be more semantic.
That's all for this week. It's been more writing than coding, but I think I understand Python’s packages and
modules
better
I usually buy at Mercadona: it’s my home’s nearest supermarket, it has reasonable prices and I know where
are located the products I buy so I can purchase everything quickly. When I go to another Mercadona it
takes me twice as long to do it; I’ve always dreamed with a Google Maps-like app which guided me through
the shortest route through the aisles to get the products, but this is something which supermarket’s owners
would like to avoid: they want us to wander through the supermarket, not to save our time.
I don’t buy online at Mercadona, but sometimes I need to check if they sell a product or the price of it.
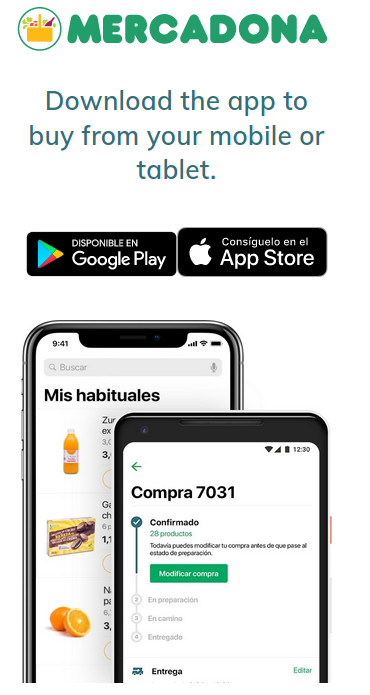
When I access Mercadona’s web using my mobile, I’m exasperated to find this screen:
I don’t want to install Mercadona’s app in my device, neither I think it’s needed. With today’s Web technologies you
can have a very good buying experience without the need to install an application. If you’re a regular customer the app will
work smoothly and perhaps it will be a good option, but I feel excluded and forced when I see that screen. I’m sure it’s a
business decision: the team at Mercadona Tech is very good and they know how to build such a web app.
But I want to access Mercadona’s web from my mobile; as a developer, I started to seek for a way to do it. I’m not a frontender,
but I thought they were using a library or a complex function to detect if it was being accessed from mobile devices. If I could
find out the criteria they were using, perhaps I could fake it somehow.
The solution was simpler than I believed: it was checking only screen width. Below 978px it detected the device as mobile and showed
the above screen. It happened in desktop browsers too, so they weren’t performing a complex checking like user-agent strings, etc.
That helped me a lot: using my tablet in landscape mode would allow me to use the web.
But, what about my phone? Was there a way to access the web? After some research I found a way: in Firefox, I could go to about:config
and change layout.css.devPixelsPerPx to 1. With that, I could use Mercadona’s web (and screwed up the display of all web pages) Why did
that work and why it had that behaviour?
It has to be with how to measure things on web pages.
When I was younger and things were simpler, there were only pixels. We all had CRT monitors capable of displaying from 640x480 to 1024x768 pixels.
If you had a 1024x768 monitor you were at the top of the range (if you were using a graphics operating system like Windows 3.11 you were
working with top tech)
Once the web arrived, things were measured in pixels. If your image had 320px width, it would occupy half of a 640px screen. And so on. You
had three different screen resolutions to support, and usually, webs weren’t accessible below 800x600px; two resolutions to support, it was all.
Nowadays you have an apparently infinite number of resolutions to support: from 4K monitors to tablets and mobiles, and your web should
display properly on all of them (that’s the purpose of responsive design and media queries) But you have another problem which has to
be with measurement: display density. That terms refer to the number of pixels you have in a given size, usually an inch, and it’s
measured in points per inch or dots per inch (ppi/dpi)
Pixels don’t have the same size on all devices. For example, if you have a 15’’ monitor with a resolution of 1024 each pixel will have
15/1024 = 0.015 inches width (you will have 1/0,015= pixels per inch, that is, a dpi of 66dpi). If you have same resolution on a 19’’ monitor,
the size of the pixels would be 19/1024 = 0,018 (16% wider and a dpi of 1/0.018=55 dpi). But if you have a mobile phone 3’’ width, each pixel
will be 3/1024 = 0,003 width (333dpi). Too small to see it well. As dpi grows, things look smaller.
If we measured pixels as before, we should change the size of each element to match different devices' dpis. The solution to this was elegant:
pixel was redefined to represent not a device pixel, but a fraction of an inch. Each pixel is now 1/96th of an inch. The browser adjusts the
size of the screen’s elements to do this. We can also use different absolute measures as cm and inches directly [1]
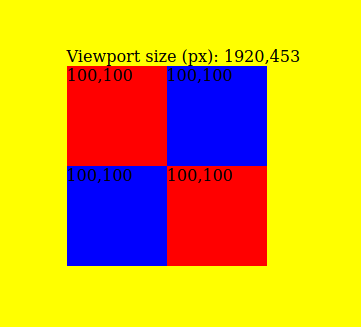
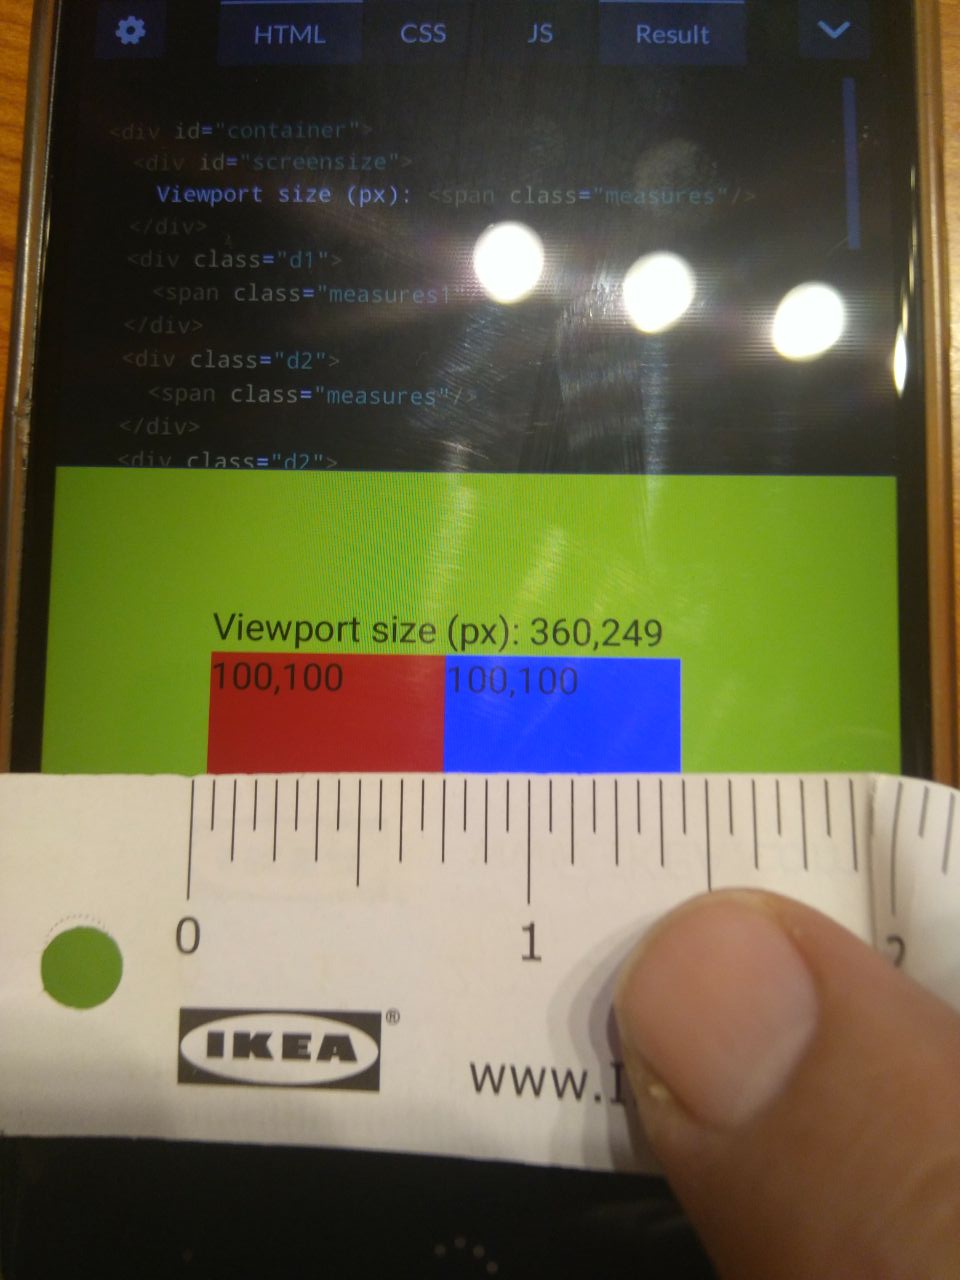
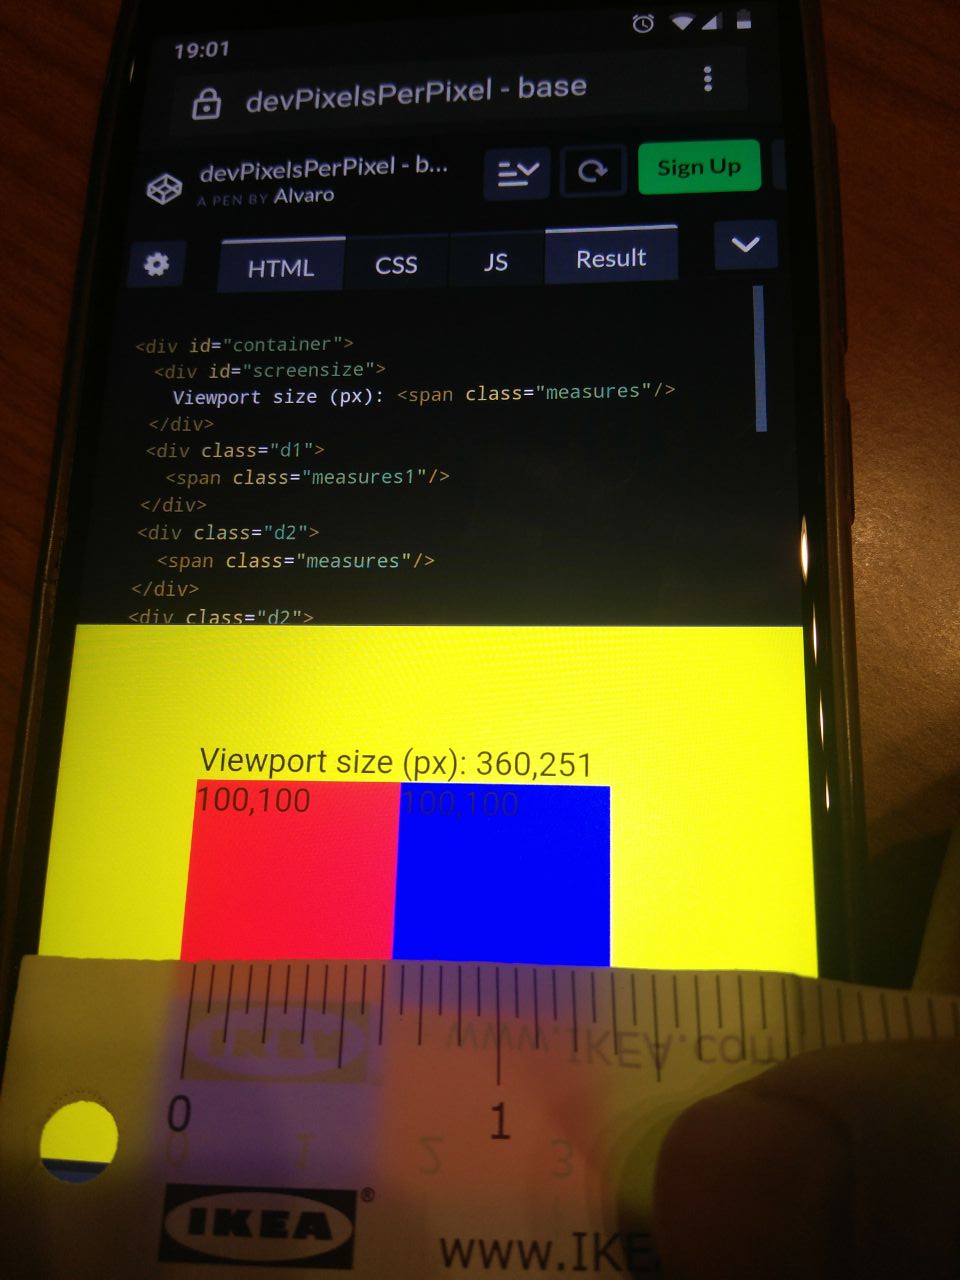
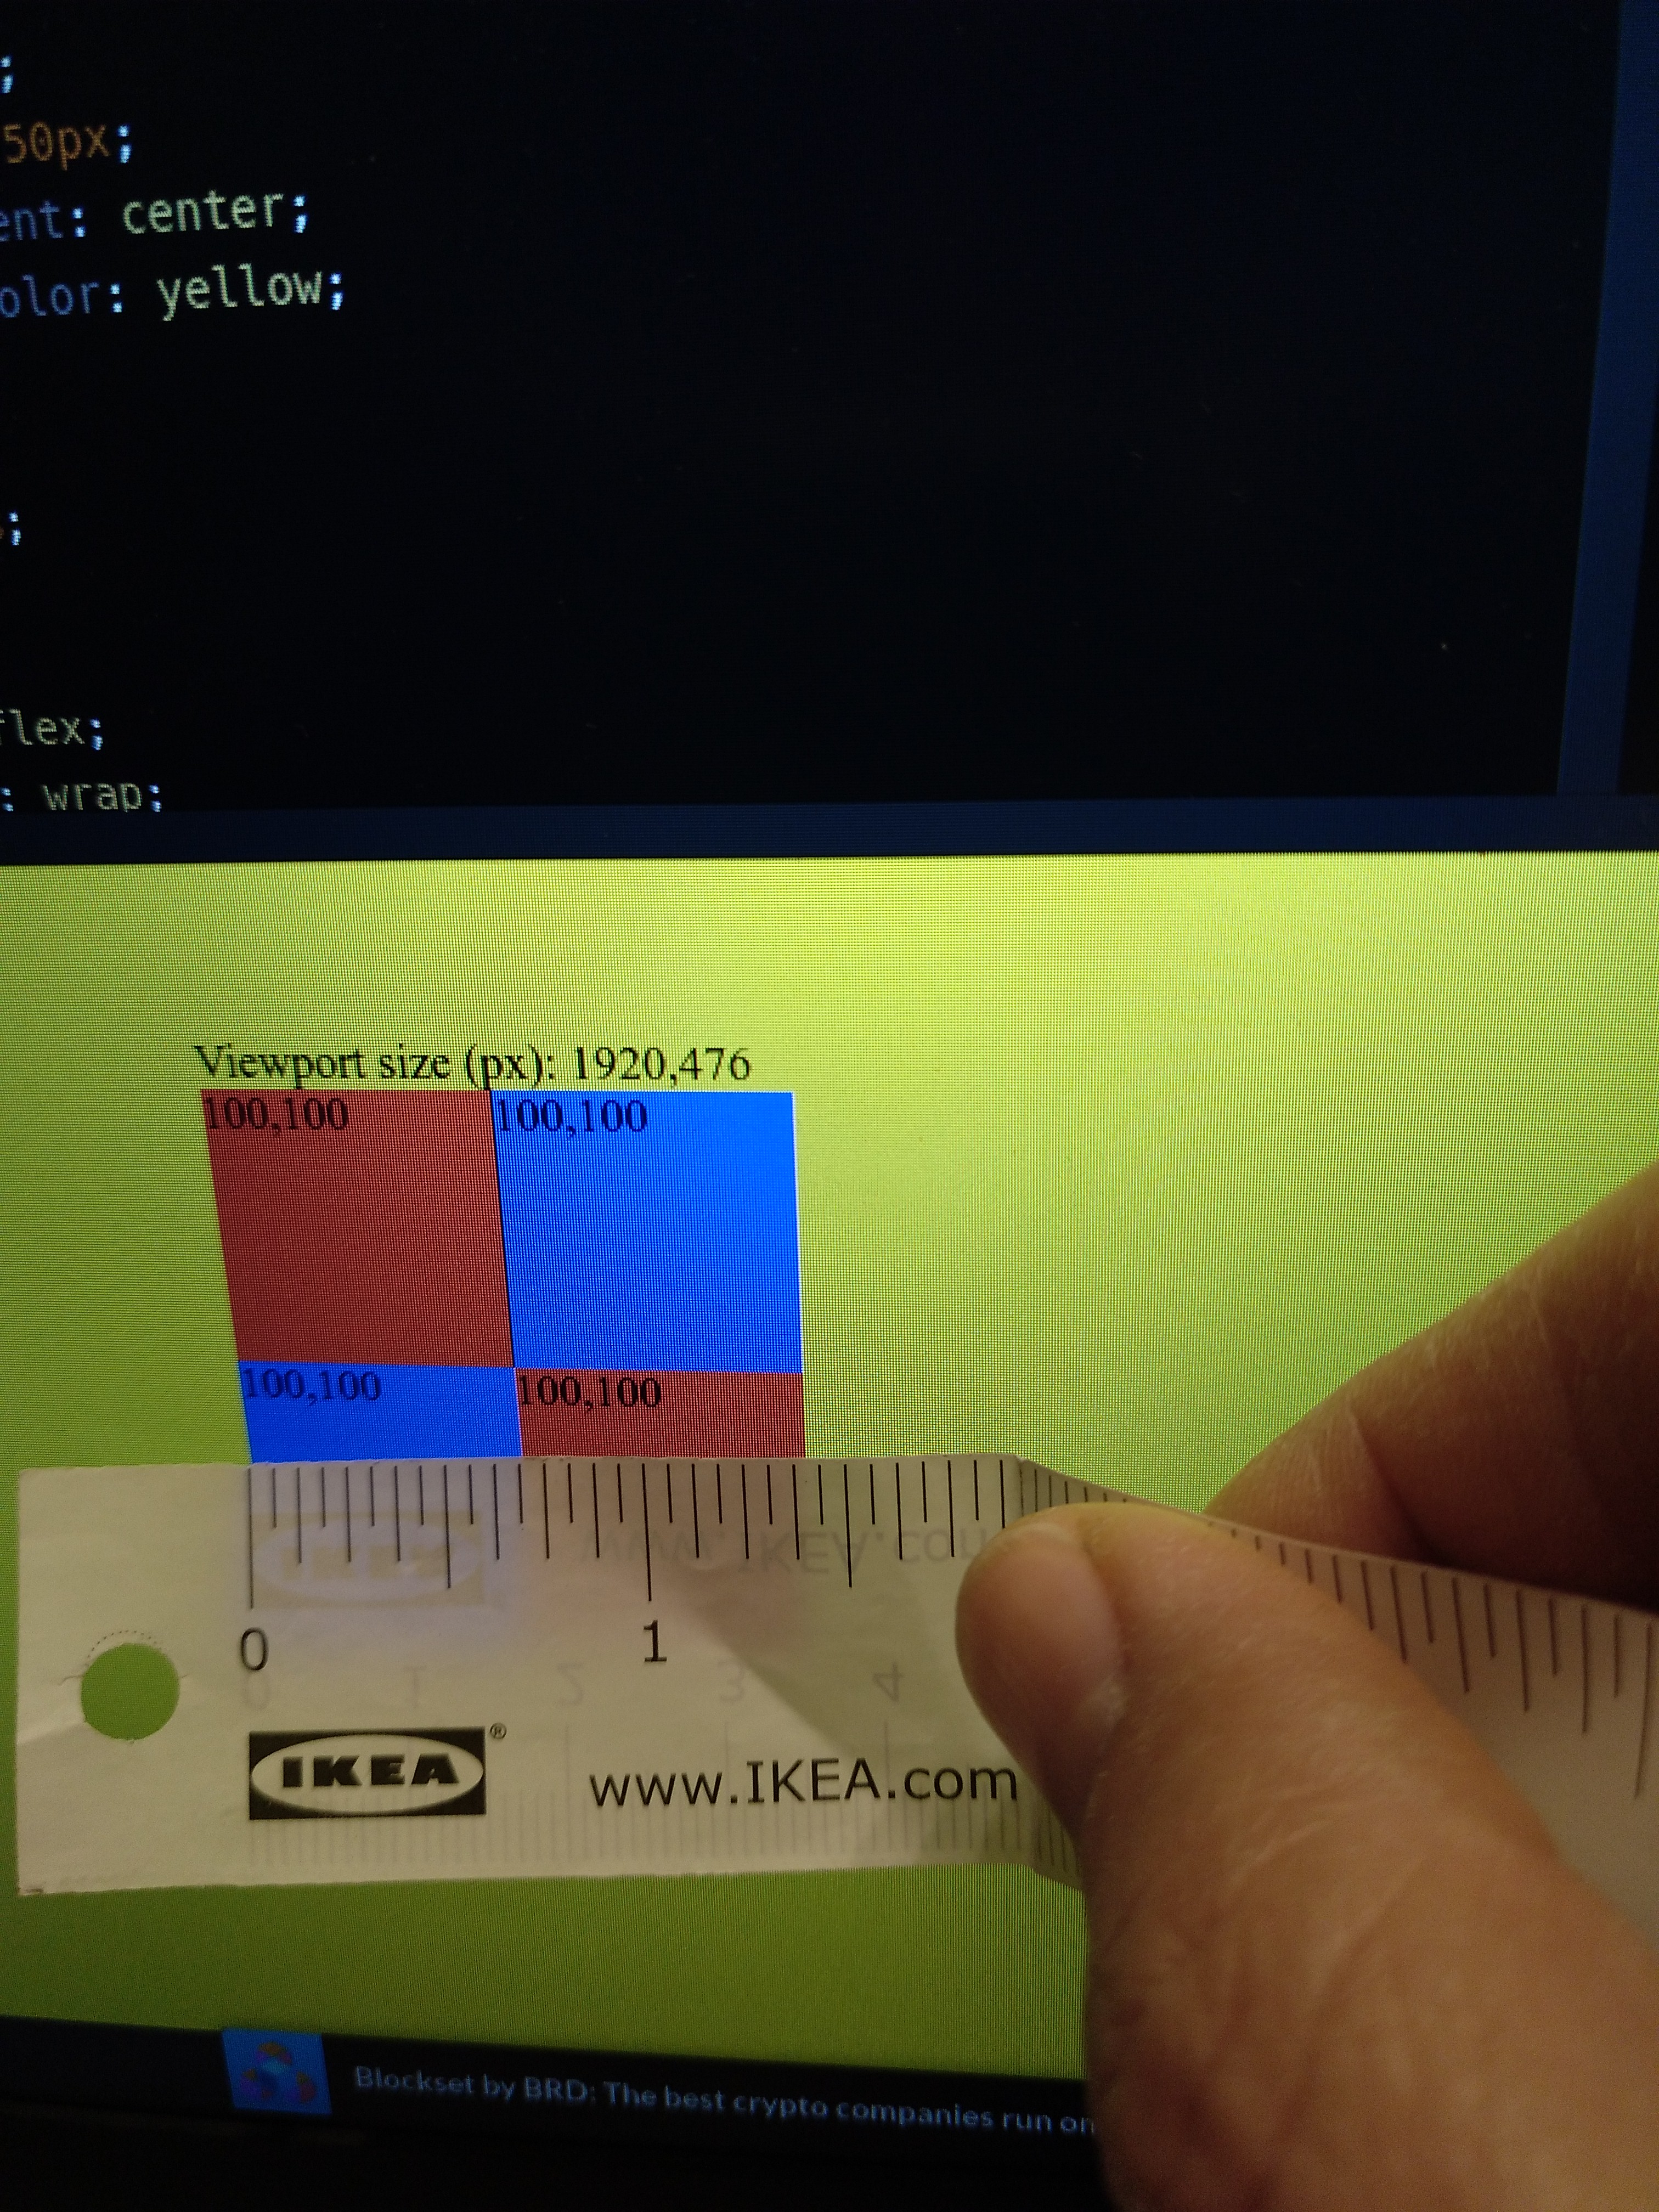
That’s the theory. In practice, all of this is bullshit. Let’s check it with a simple codepen example. I’ve created four squares: red squares
are 100px width. Blue squares are 1.041666in. All of them should have the same size (because 100px = 100*1/96 inches) Does that work? Yes,
they have the same size:
You can see also viewport size, measured in pixels. More about it later.
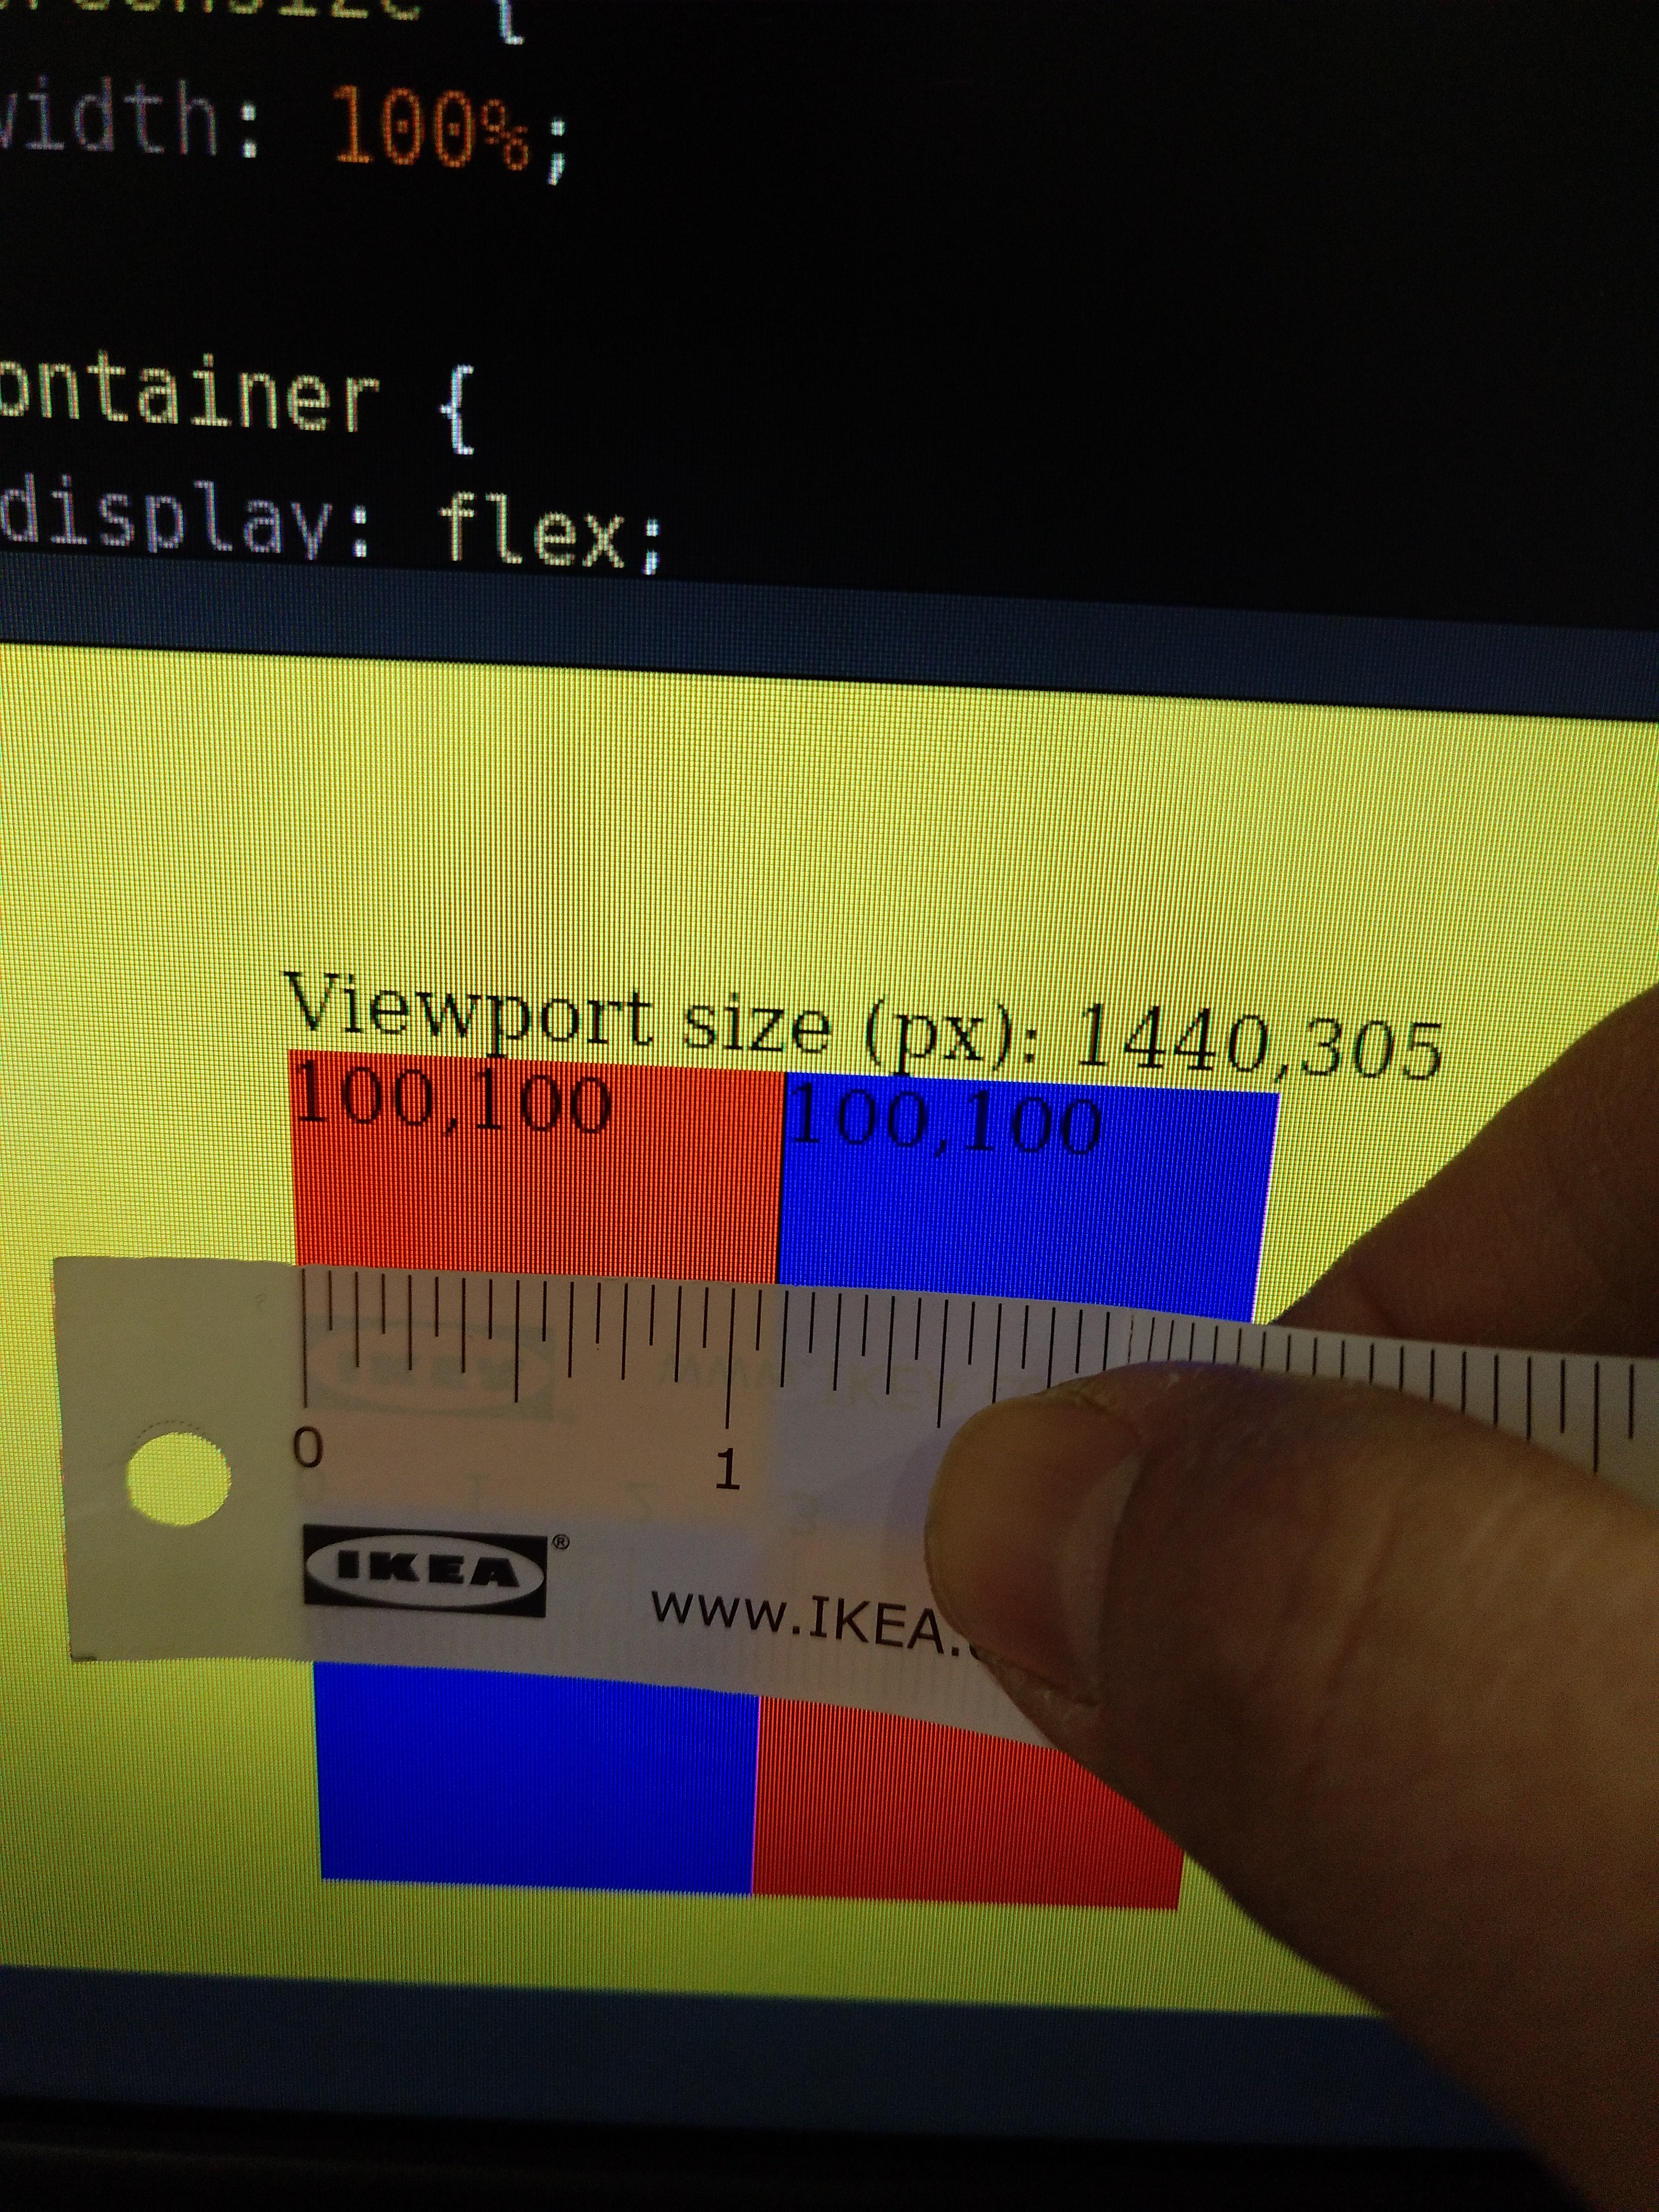
But, does that really work? Do the squares measure 1inch each, more or less? Let’s check it in three different displays with an Ikea’s meter:
Squares on a 19'' monitor
1 1/8'' aprox.
Squares on a 15.6'' laptop
6/8'' aprox.
Squares on a 4,5'' mobile
6/8'' aprox.
Bullshit. They don’t measure 1'', and they don't have the same measure on each device. Maybe it has an explanation, but I think this is the
kind of shit a frontender designer must fight daily. Those are the kinds that make me hate frontend development.
But, returning to Mercadona’s web. My mobile device has 1080 px width (1920px using it in landscape mode) So why is the mobile
browser detecting less than 978 pixels? It should show the real web and not the fuck-you-and-install-the-app screen. However,
you can see that viewport size is 360px, one-third of real resolution, and much less than the 978px required by Mercadona. That
is because the browser is using 3 device pixels to draw each of the web’s pixels. That ratio is what “devPixelsPerPx” property
controls. I think that when you set the value to -1 (and 0, which seems to have the same effect) the browser uses some algorithm
to detect the optimum ratio. Augmenting the ratio has the effect that webs’ elements look bigger, so elements have the same
relative aspect to our eyes.
It seems that you can set a fractionary number for that property, but not using an integer number of device pixels for each web
pixel would result in a blurry image when rendering the web.
One last check: what about the same device but a different browser? Let’s see on my mobile phone:
Firefox
6/8'' aprox.
Lineage OS default browser
6/8'' aprox.
Chrome
6/8'' aprox.
And on my laptop:
Firefox
11/16'' aprox.
Chrome
11/16'' aprox.
The images are the same size, so it seems that measures are consistent across browsers but no across devices (the font is smaller in chrome,
but I will investigate it another time; fonts are another world)
That’s it. Now I can check from my mobile if Mercadona sells chickpea flour wherever I will be if I want to cook some falafel
(hint: they don’t, but you don’t need it if you have chickpeas and a Thermomix)
Well, now that I have two posts is time to refactor. A static site is simple, but it will give me a lot of work as the
number of posts grows. I think I will want to have only some post listed on the home page, have some kind of categories
or organization by date… the idea is to have at least 52 posts at the end of the year so those utilities will be useful.
In simpler times, just after the use of static sites as blogs, people used simple applications to manage their blogs.
Nowadays those applications had evolved into monsters like Wordpress. I wanted something more simple and built by me:
after all, the idea is that this blog to be a place for my own learning, and installing something built by another people
won’t bring me very much.
I chose Flask as the framework to build such an application: I’m learning Python so that will be the language for the app.
There are more complicated frameworks like Django, but Flask is less opinionated and it will allow me to be more flexible
with my code. I’ll code more, it’s sure, but maybe I can apply Domain Driven Design concepts, testing, etc.
After choosing Flask I had a (great and original) idea: what if, after writing a post, my app generated the entire site in Html
and that was what would be uploaded to the server? I only wanted a static site, perhaps with the ability to write comments.
This approach would be enough for my blog and It would be easier to deploy.
But after googling about it I realized two things: it was a good approach but it was not at all original. There are
lots of frameworks and libraries to help with that. A static site has strong advantages:
speed, security and ease of deployment, so it's a path which has been explored by developers in the pasts three or four years.
I think I’ll use a mixed approach. There is a library, flask-freeze, which takes a Flask application and generates a static
site. That will be enough until I include comments; then I plan to use a mini-server which manages comments and regenerates
the post page as needed.
By now I have a basic Flask app running, serving the posts and generating a static site from it. The posts are fixed: there is
no database at the moment.The code for creating a Flask application is very simple:
Routes work with annotations. I didn't like annotations very much: they obscure the code because you must look in another place to discover what the annotation is doing. But later I learnt some functional programming and discovered that
annotations are higher-order functions. and, if used with
care (only a couple of annotations with well-defined meaning across and app) can be useful.
On the other hand, I do not like the use of annotations to define the routes: I believe that the routes are part of the application configuration
and should be together in some file so they are easy to visualize and modify. Flask allows to define the routes through app.add_url_rule(), but
for now, I will use the decorators until the application has a more complexity.
The only route for the app will render a Jinja2 template. I have a template for the site scaffold and another one, inheriting from it, for the
index. I've also included a custom font for the site and a code formatter.
Next steps: a post’s database and the thing I fear more: introducing TDD. But that will be next week.
I've seen people who, as a New Year's Resolution, have decided to blog every day. That's too much for me, but I
want to start blogging again so I think new years is a good moment to do it.
There was a time, when Internet was younger and blogging was new and anonymous, when I wrote a post almost every
week. They were long posts and served me to reflect and clarify my thoughts (and also to make some friends whom
nowadays are lost) In those days I wanted many people to read and comment on my posts. Now, I doubt anybody read
this, so I will use the blog for personal reflections.I believe that doing a weekly written reflection on what I
am learning, what I am building or the direction I want to take cand help me to clarify my ideas and give me a
deeper understanding of what's happening.
This year I want to change jobs and consolidate my knowledge of artificial intelligence, so taking some time each
week to look back can be useful to me. I also want to improve my English skills, so I'll write it in that
language. I can read English very well, and I can understand it well, but I'm not used to speaking or writing.
It will be painful at first (I needed to use an automatic translator and grammar checker to write this and avoid
some mistakes) but I hope this will get easier over time.
I'm a 46 years old programmer. I came from a world where things were simpler.
When I started my career there were only a couple of tools and different jobs in this sector. If you learnt C,
COBOL, Pascal and Assembler you could work in almost every position. Java was a cutting-edge technology when it
was
launched
I was working in IT for more than fifteen years, but a couple of years ago I started to work as a teacher after
two
years of being a bank cashier. All that time I've been trying to keep my knowledge up-to-date in web development
(the branch I was specialized in) but it's almost an impossible task. Technology is developing at an exponential
rate and is difficult to have a base knowledge of the more relevant tools and practices.
As I want to work in development again, I'll start some projects, make some experiments and take some courses to
explore where could I go now. My goal for the next years is to work from home with flexible schedule and earn
200k
euros per year.I think is a very ambitious goal, but I'll keep it in mind and will see where I can arrive.
I'll start with this blog. What did we do in simpler times when somebody needed a blog?: a static page. Let's
build
one.